Saturday, December 19, 2009

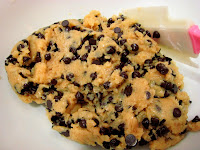
Monster Cookies


Last night we went over to Sandra and Nico's new house in Ari for a housewarming-cum-Christmas party. The party was aptly themed "Bring your own food". How convenient. There's also the gift exchange, which was a real challenge for me. For days I was harassing friends for ideas. Some of the suggestions I got included: toiletries, photo frame, towel.... non of which was very inspiring. Most importantly, non of which was gift I personally want to receive.

Eventually in the morning of our big night, Nuk showed me the picture of her gift through Yahoo Messenger: two baskets of large eggs. Let me re-frame that: two baskets of large eggs with double yolks. Go figure. Anyway I guessed it's not illegal to bring food item. So I decided instead of buying a hamper, why not bake some cookies? I did a pretty good job with my first batch of cookies for Yim's birthday. I think.

After some reading, I got the idea that cookies basically come from the same batter. You can add whatever you want for that extra personal touch. I found this recipe recipe for kids that uses multi-colored MnM's chocolate candy. I made some changes to suit the adult taste: dark chocolate in the peanut butter cookies for half the guilty sugar rush; and pecan nuts and Mars bar niblet to make up for the lack of sugar rush in the aforementioned recipe. Redundant. I know.

These recipes make 3 dozens cookies each. I baked a dozen each because the box can't fit more than that. Lame. I know. But hey! Look I put a ribbon over the box!


Adrian and I were leaving early and we got to pick our gifts before everyone else. I got a Calvin and Hobbe's from Sandra. MY FAVORITE! This is probably one of the best "lucky draw" gifts I've ever get. Adrian got a Starbuck's card from Gate. What else can a coffee addict ask for? Sandra later text me and said that whoever got my cookies shared them with everyone: "it was a hit!"

Ingredients:
(make 2 dozens)


For the Peanut Butter cookies:
  • 1/4 cup butter, soften at room temperature
  • 1/4 cup organic creamy peanut butter
  • 1/4 cup unrefined white sugar
  • 1/4 cup natural brown sugar
  • 1 egg
  • 1/2 teaspoon pure vanilla extract
  • 1 1/4 cup unprocessed all-purpose flour
  • 1/2 teaspoon fine sea salt
  • 1/2 teaspoon baking soda
  • 1 cup dark chocolate chips
  • sea salt
For the Mars Bar Cookies:
  • 1/2 cup butter, soften at room temperature
  • 1/4 cup unrefined white sugar
  • 1/4 cup natural brown sugar
  • 1 egg
  • 1/2 teaspoon pure vanilla extract
  • 1 1/4 cup unprocessed all-purpose flour
  • 1/2 teaspoon fine sea salt
  • 1/2 teaspoon baking soda
  • 3 Mars Bar,
  • 1/4 cup pecan, chopped
  • sea salt
  1. Preheat oven to 180C. Line baking parchment over a baking tray.
  2. Cream together butter (peanut butter) and sugar. Whisk in egg and vanilla extract. Set aside.
  3. Sift flour, salt and baking soda in a separate bowl.
  4. Fold flour mixture into butter mixture. Add fillings.
  5. Transfer batter to baking parchment one tablespoon at a time. Sprinkle with sea salt. Bake for 15 - 18 minutes.

Barley Grilled Vegetable Salad with Avocado Dressing


Finally the long awaited house-warming/ Christmas party at Sandra and Nico's was here. It was aptly themed "Bring your own food". Clever hosts. I thought I would bring some dessert but Francois said he was bringing something sweet. Gate also mentioned raspberry crumble. What a bummer. What can I bring that I could prepare in advance, ok to be served not warm?

I thought about making a fruit salad with maple-spiced nuts. Then I remembered there was a pack of barley that I cooked and freeze in the freezer a while back. Maybe I should make a big bowl of something like the Barley Pilaf, which I did and made a few changes to make the preparation easier. I remembered a avocado dressing that I made before, which Adrian liked and decided to use that as a dressing for the grilled vegetables. I added hard-boiled eggs for that extra protein for the vegetarian Yogis and Yoginis. There's also the roasted cashew for the texture and goat cheese for the distinctive taste.


The dressing ingredients would most likely make more than what you need. We used the extra as nacho dipping; worked as guacamole. For some reason, besides Adrian, I knew Sandra would approve the dish. She did. I was pleasantly surprised that everyone else did too! I don't get to cook for many people all the time. Sometimes I think Adrian may be just acting out to keep me in the kitchen. It's good to know others enjoyed my cooking too.

Ingredients:
For the dressing:
(you may not need all of this)
  • 2 avocados
  • 2 cups coriander leaves
  • 2 cloves garlic
  • juice of 2 limes
  • 1 cup yogurt
  • 1 cup sour cream
  • sea salt to taste
  1. Blend all the ingredients together to a smooth consistency. Set aside in the refrigerator.
For the barley:
  • 2 Cups cooked barley
  • 1 onion, minced
  • 2 cloves garlic, minced
  1. Saute onion with a generous pinch of sea salt until translucent. Add garlic, fry until fragrant. Stir in cooked barley. Toss to coat. Set aside.
For the tomatoes:
  • 10 Cherry tomatoes, halved
  • 4 TB extra virgin olive oil
  • 2 TB Balsamic Vinegar
  • 1/4 teaspoon each of cumin, paprika, cayenne pepper, chili flakes and ground coriander
  • Natural cane sugar
  1. Preheat oven at 200C.
  2. Whisk together olive oil, vinegar and spices. Toss in tomatoes to coat.
  3. Arrange tomatoes on baking pan with cut sides up. Sprinkle sugar over tomatoes.
  4. Bake until tomatoes are shrunken, about 20 minutes.
For the vegetables:
  • 2 red bell pepper, seeded, cut into wedges
  • 2 yellow bell pepper, seeded, cut into wedges
  • 2 zucchini, cut into 1" thick coins
  • 1/2 Cup extra virgin olive oil
  • 1/4 Cup Balsamic vinegar
  • 1 teaspoon sea salt
  1. Whisk all ingredients together. Toss in vegetables. Bake in oven until tender.
  2. Remove from oven. Cut zucchini coins into quarters. Cube vegetables.
To assemble:
  • 4 hard-boiled eggs, sliced into coins
  • 1 cup cashew nuts, roasted and chopped
  • Goat cheese, crumbled
  • coriander leaves to garnish
  1. In a large serving bowl, toss barley with 1/4 of the avocado dressing.
  2. Top with grilled vegetables, tomatoes, eggs, cashew nuts and goat cheese. Drizzle more dressing over. Garnish with coriander leaves if you wish.

Friday, December 18, 2009

Crispy Chewy Chocolate Chips Cookies


Yim painted me a picture of my all-time favorite Japanese anime - Totoro - for my birthday. Given what little talent I have, I decided to bake her something for her birthday. Initially I wanted to bake brownies because she doesn't like brownies. Something to do with childhood trauma. I thought I would help free her from the bygone and start embracing brownies the way these sweet treats deserve. For reason unknown to me, Adrian expressed his sympathy for Yim when I told him of my good-will plan.

Anyway, I set out to searching for a good brownies recipe but I somehow settled on cookies. There are many cookie recipes but non of them are interesting enough to capture my attention. After all cookies are just flour, egg, sugar, oil, salt and leavening agent. Pretty idiot-proof. Right?

Wrong. I once watched a Hong Kong TV sitcom that made a big fuss about fried rice because it was the true test to the chefs. I heard the same thing said about omelet, too. Apparently the unassuming chocolate chip cookie is the baker's crucible. So few ingredients, so many possibilities - for success AND failure -. A quick search on internet shows a multiplication of the humble recipe, some more mutated than the other, cookies topped with bacon for instance.

Then I stumbled upon this article on New York Times on Quest for the Perfect Chocolate Chips Cookies. It has great tips from the grandmother of Chocolate Chips Cookies, Ruth Graves Wakefield, and also some of the best bakeries in New York such as Jarques Torres Chocolate and City Bakery. One of them is to leave the dough for 36 hours before baking. I had to skip this step because I had less than 16 hours before I saw Yim.

While the famous bakeries have chocolate made for them, with the lack of such luxury, I used local dark chocolate chips. They work pretty well as far as I can tell. However I did pick up the next most essential tip: sea salt. There's nothing special about the recipe that I used. What set it apart is the sea salt. A sprinkling of sea salt just before baking add a distinctive dimension to the Chocolate Chip Cookies. I shall never underestimate the use of salt in sweet baked goods ever!

Ingredients:
  • 2 cups all-purpose flour
  • 1/2 teaspoon baking soda
  • 1/2 teaspoon salt
  • 3/4 cup unsalted butter, melted
  • 1 cup natural cane sugar
  • 1/2 cup white sugar
  • 1 tablespoon pure vanilla extract
  • 1 egg
  • 1 egg yolk
  • 2 cups semisweet chocolate chips
  • coarse sea salt for sprinkling
  1. Preheat oven at 170C. Line a piece of baking parchment over baking tray.
  2. In a mixing bowl, sift together flour, baking soda and salt. Set aside.
  3. Cream butter with sugar, vanilla extract and eggs.
  4. Fold the wet ingredient into the dry ingredients. Add chocolate chips and mix to combine.
  5. You may leave the dough for up to 36 hours in the refrigerator before baking. Or proceed to bake as I did. Use what you need and freeze the rest.
  6. Drop two tablespoons (or one for smaller cookies) of dough at a time onto the baking parchment. Cookies should be 3" apart.
  7. Sprinkle with sea salt. Bake in preheated oven for 15 - 18 minutes for big cookies or 10 - 15 minutes for smaller ones.

Homemade Sourdough English Muffins


Now that the sourdough starter is ready, I shall proceed with Sourdough English Muffins as planned. Most of the online recipes I found are similar. I followed the recipe from this site. However, in Peter Reinhart's Bread Baker's Apprentice he instructed to bake the fried muffins in a oven at 180C for 5 - 8 minutes to ensure the center is baked. I didn't do this step and it didn't turn out to be necessary in my case.

Instead of cutting the muffins with knife, Peter Reinhart suggests to do it with fork to create the nooks and crevices "fork-split" English muffins that commercial brands like to trumpet about.

I like them being crispy on the outside, and soft and moist on the inside. I thought they were really good but Adrian didn't comment much, not as enthusiastic as he usually does. But he asked to have one more after the first one. I take it that i can now tick Sourdough English Muffins off my to-bake list.


Instead of using cookies cutter, I used round glass. I made 11 3" wide 1/2" thick muffins.


These are fun to make. Instead of baking in the oven, the muffins are fried in a skillet or on a griddle - 6 - 8 minutes on one side before flipping over to fry the other side.


The muffins are fried to just golden brown. Some are turning a little burned. Got to watch the heat.


Friday, December 11, 2009

Sourdough Starter

The idea started with the plan to make English muffins. Since I'm going to do it, I may as well bring it up a notch by making it a Sourdough English Muffin. All I have to do is to find out what is sourdough and how to make the starter.

It's surprisingly easier than I thought. All you have to do is put together the ingredients and let them sit in room temperature for 3 days. I left the culture in the living room and for 3 days our space smelt malty. In a pleasant way.

There are many ways making the starter. Peter Reinhart uses pineapple juice and rye flour in his Bread Baker's Apprentice book. As my first sourdough starter project, I decided to pick a easier recipe from the internet that uses ingredients readily available at home.


Ingredients:

  • 1-1/2 cups whole milk
  • 1/2 teaspoon instant yeast
  • 1 teaspoon honey
  • 2 cups unbleached all-purpose flour
  • 1/4 cup water
  1. Warm milk over medium heat to lukewarm.
  2. In a large mixing bowl, mix together milk, yeast, honey and 1 1/2 Cups of flour.
  3. Cover with plastic wrap and leave it in a warm place for 3 days. Stir once a day.
  4. After 3 days add 1/2 Cup of flour and 1/4 cup of water. Cover and let sit for 4 hours. It should give out a beer tangy smell.
  5. Use what's needed and refrigerate the rest in a sealed jar for up to 4 weeks.

Thursday, December 10, 2009

Double Decker Quesadilla with Homemade Tomato Salsa


Here's another idea for serving with Homemade Tomato Salsa. All of the sudden, Mexican cuisines become so easy now that I have the salsa handy. Apart from the Cheesy Enchilada, I have also used it for pizza with great result.

I used Gouda cheese here because for some reason there's no Jack cheese in either Gourmet Market or Tops. I must have bought the last one from Villa Market. If you find Pepper Jack Cheese, go for it and omit the jalapeno pepper. I just thought mixing jalapeno pepper and the cheese together would generate similar taste to that of pepper Jack since that's what it's about (don't quote me, I never have pepper Jack before).


"Every bite is a surprise" Love the combination of sharp Cheddar and nutty, buttery Gouda.


Ingredients:
(makes 2 servings)
  • 3 flour tortilla
  • Pure sesame oil
  • 1/2 cup sharp Cheddar cheese, grated
  • 1/2 cup Gouda cheese, grated
  • 1 small pickled jalapeno pepper, sliced
To Serve:
  1. Preheat oven at 120C. Lay a piece of baking paper over baking tray.
  2. Brush a piece of tortilla with just enough sesame oil. Place it greased side down on the baking paper. Sprinkle Cheddar cheese over.
  3. Top it with a second flour tortilla. Put on top Gouda and jalapeno pepper. Cover with the third piece of tortilla. Brush top with sesame oil.
  4. Bake in the oven for 10 minutes or until the cheeses melt.
  5. Let it cool and set for 5 minutes. Cut it into 6 wedges. Serve with Homemade Tomato Salsa and sour cream.

Mexican Grilled Peppers and Corn Salad


I'm improvising the Pinto Beans, Persimmon and Avocado Salad and calling it Mexican because I threw in to it habanero chile and cilantro. You see, they are basically the same except there's no persimmons in this recipe but more hearty with the addition of grilled bell peppers and corn. To the dressing, I added some honey. It did taste more flavorful than without.


If you have a tiny kitchen the size of mine and no grill. This is what you do when the recipe calls for grilling. Just make sure you raise the rack high enough that the vegetables don't touch and burn by the electric hot plate.


Serve it as a side with a Double Decker Quesadilla.

Ingredients:

(makes 2 servings)

For the Salad:
  • 1/2 red bell pepper, grilled and diced
  • 1/2 yellow bell pepper, grilled and diced
  • 1/2 con of fresh corn, grilled, use niblets only
  • 1 habanero chili, core and seed removed, diced
  • 1/2 cup cooked pinto beans
  • 1 avocado, peeled and diced
  • 4 cherry tomatoes, quartered
For the Dressing:
  • 2 TB extra-virgin olive oil
  • 1 small clove of garlic minced
  • 1/4 medium-size red onion, chopped
  • 1 TB fresh orange juice
  • 2 TB lime juice
  • 1 TB organic raw honey
  • Ground cumin
  • Sea salt and ground black pepper to taste
  • Cilantro leaves as garnish
  1. Simply toss all the salad ingredients together with salad dressing.

Tuesday, December 8, 2009

Persimmon Salads

Once we walked pass the Japanese food fest area in front of Gourmet Market at Paragon. We saw this beautiful looking Japanese persimmon that costs 210 BHT EACH. Inside Gourmet Market the nationality-unknown persimmons are costing 29 BHT EACH. Why are Japanese fruits so unaffordable?

Anyway, I have always liked persimmons. My father used to teach us how to identify seedless persimmons. Something about the shape and size of the fruit that I can't quite remember and never get to verify. I also like them dried. I used to keep a jar of them and take one whenever I leave the house. Hence, it's shocking to hear that the man of my life is not all that into persimmons. And you know what I was going to do the moment I found out about that.

Here's a couple of persimmons recipes that I tried.


Pinto Beans, Persimmons and Avocado Salad
I boiled up a whole lot of pinto beans the other day for Refried Beans, hence the use of pinto beans instead of other varieties. I imagine black beans, chickpeas, and split peas would do just as well. The avocado was a little bit too ripe - they didn't hold the shape, looking mushy. Something is missing in the dressing but i just can't figure it out. Honey, maybe?

Ingredients:
(makes 2 servings)
  • Cooked pinto beans
  • 1 avocado, cubed
  • 1/2 persimmon, cubed
  • 1 Tablespoon green onion, sliced
  • sea salt
  • extra virgin olive oil
  • cumin
  • Tabasco sauce
  • lemon juice and zest
  1. In a mixing bowl, toss together olive oil, cumin, Tabasco and lemon juice. Stir in the beans and let them absorb the dressing.
  2. In a separate bowl, mix together avocado and 1 tablespoon of lemon juice and salt.
  3. Add persimmons, green onions and avocado to the beans. Toss gently to combine. Season with salt if needed.

Persimmon Salad with Ginger-Maple Vinaigrette

We totally approved of this recipe - it blends the sweetness of maple syrup, tartness of apple cider vinegar and lemon juice, and ginger spice into a complex, pleasant gustatory experience. It felt Asian, perhaps because of the use of ginger. It also reminded me of a ginger chicken dish that my grandmother used to make. Or was it the carnivorous remnant inside of me that's speaking?


Although it's optional, the Parmesan cup is very easy to make, and a savory pleasure to behold. Depending on your serving size, you can use anything from 1/4 cup of grated Parmesan for an individual serving, as I did. Sprinkle some ground black pepper and flatten them over a piece parchment paper. Bake in 120C oven until golden in color. Quickly mold it into cup.

Ingredients:
(makes 2 servings)
  • Pure sesame oil
  • Extra virgin Olive Oil
  • 1 tbsp Ginger, Minced
  • 1 tbsp Shallot, Diced
  • 1/2 tbsp Pure Maple Syrup
  • 1 tbsp Apple Cider Vinegar
  • 1 tbsp Lemon Juice and Zest
  • 1/2 Persimmon, cubed
  • Rocket leaves
  • Sea salt and Pepper
  1. In a mixing bowl, whisk together lemon juice, cider vinegar, salt and pepper. Macerate onions for at least 10 minutes.
  2. Heat 1 tablespoon of sesame oil over medium heat. Fry ginger until soft.
  3. Transfer ginger to onion mixture. Add the rest of the dressing ingredient. Toss in rocket leaves and persimmons.

Sunday, December 6, 2009

No Bake Peanut Butter Chocolate Square


I adapted the recipe from this site. The dark chocolate chips didn't melt to a spreadable consistency. I added splash of whole milk to thin it out. Adrian was surprised when I told him the chocolate topping was made from the chocolate chips. Once he ate a couple of them because we ran out of chocolate and he had this craving to quench. He thought they were bad. I tasted the melted chocolate and decided to add maple syrup to make it "taste like high quality chocolate" as Adrian later testified.

We loved this Peanut Butter Squares. It's one of those desserts that we can't stop having more, and wish they never run out: we had 6 of out of the 10 squares; that's how much we loved it. I have this bag of digestive biscuits that I bought long time ago thinking I would use them to make a cheesecake that I once fell in love with. Anyway it hasn't happened and it's the only thing that remotely resembles graham crackers, hence the use of it. The biscuit crumbs add just the right touch of texture to the peanut butter layer. You may add more, or some chopped peanut butter, for more crunch.

Ingredients:
(makes 10 squares)
  • 1/4 cups confectioners' sugar
  • 1/4 cup unsalted butter, softened
  • 3/4 cup natural chunky peanut butter
  • 1/4 teaspoon pure vanilla
  • 1 1/2 cups digestive biscuits, crushed
  • 1/4 tablespoon natural chunky peanut butter
  • 1/2 cups dark chocolate chips
  • 1 Tablespoon maple syrup
  • splash of whole milk
  1. Line a 4" x 6" baking pan with aluminium foil with overhang around the sides.
  2. With a electric mixer, blend together together sugar, butter, peanut butter, and vanilla. Fold in biscuit crumbs and press the peanut butter mixture over the bottom of prepared pan.
  3. Place a heat-proof bowl over a saucepan of boiling water. Melt chocolate chips and peanut butter to a spreadable consistency. Add whole milk and maple syrup if needed.
  4. Pour chocolate mixture to top the peanut butter layer. Let sit in refrigerator for 1 hour or until chocolate is set.
  5. Use the aluminium foil to lift the entire bar out of the pan. Remove the aluminium foil and cut bar into 10 squares. Return to refrigerator for another 2 hours before serving.

Four-Cheeses Pizza withTwo Toppings

Here's to put the pizza dough to test. I must say I am very pleased and proud of my first pizza, the crust to be more specific. The biggest compliment came when Adrian said his mother used to make pizza but she could never get the crust right. Call it rivalry if you may. His mother, however, is my source of inspiration (or challenge?). Adrian has this childhood memory of wholesome home cooked foods by his Swiss mother: tart, pie, jam, French toast etc. I guess I'm just helping my husband to relive the good old time.

Four-Cheeses Pizza with Homemade Tomato Salsa


Ingredients:
  • 1 6 oz pizza dough
  • Homemade Tomato Salsa
  • 1 oz Fontina, grated
  • 1 oz Mozzarella, grated
  • 1 oz Goat cheese, grated
  • 1 teaspoon fresh thyme leaves, minced
  • 1 teaspoon fresh oregano, minced
  • 1 Tablespoon Parmesan, grated
  1. Preheat oven to 250C. Lightly flour the back of baking tray.
  2. Dip pizza dough in a bowl of flour. Shake off the excess. Using a rolling pin, roll the pizza dough into a 8" round, with the edges slightly thicker than the inner circle.
  3. Brush the inner circle with tomato salsa and top with Fontina, Mozzarella and Goat cheeses. Sprinkle with thyme leaves and oregano. Top with Parmesan.
  4. Place it on the back of floured baking tray. Bake for 10 - 15 minutes or until it turns brown.
Four-Cheeses Pizza with Homemade Pesto and Oven-Dried Tomatoes


I got Adrian to contribute to this pizza: flipping and tossing. Peter Reinhart would have approved.


Unlike the on that I made with rolling pin - thin throughout -, this pizza crust is somehow puffy like Indian puri, and crispy like biscuit. Must be the skilled pizza dough tossing.

Ingredients:

(makes for one 8" pizza)
  • Pesto
  • Oven-dried tomatoes
  • 1 oz Fontina Cheese, grated
  • 1 oz Mozzarella, grated
  • 4 cherry tomatoes, quartered
  • 1 oz Goat cheese, grated
  • 1 teaspoon fresh thyme leaves, minced
  • 1teaspoon fresh oregano, minced
  • 1 Tablespoon Parmesan, grated
Basil and Pecan Pesto
Go here for the pesto recipe.


Oven Dried Tomatoes
:

(makes for one 8" pizza)

This recipe is not unlike the Herbed Oven Dried Tomatoes except it uses fresh thyme instead of basil and marjoram. I bake it for a mere 60 minutes instead of the full-on 6-12 hours needed for a "real" oven dried tomatoes. I used cherry tomatoes simply because that's what I got. Any tomato varieties would work.


  • 6 cherry tomatoes
  • extra-virgin olive oil
  • fresh thyme leaves, minced
  • 1 garlic cloves, crushed
  • sea salt
  • ground black pepper
  • sugar
  1. Preheat the over to 150C. In a pot of boiling water, blanch tomatoes. Drain and refresh in ice water. Drain. Peel, core, cut into halves, and remove seeds.
  2. In a mixing bowl, whisk together olive oil, thyme, garlic, salt and pepper. Taste and season as needed. Toss and coat tomatoes with the oil mixture.
  3. Arrange tomatoes, cut side down, in a baking pan. Drizzle with the excess oil mixture. Sprinkle sugar evenly over tomatoes.
  4. Bake until the tomatoes begin to shrivel, about 1 hour. When the tomatoes are cool enough to handle, transfer to a container. Pour olive oil over and cover the container. Refrigerate and use as needed.
Dress the pizza as above except substitute Homemade Tomato Salsa with Pesto; add Oven-Dried Tomatoes around the inner circle after pesto; arrange fresh tomatoes before goat cheese; and top with fresh basil leaves after baking.

Homemade Pizza Dough


We have a part time maid that comes to the house once a week. We totally love her. Once she saw my pathetic attempt of growing extra store bought green onions in glasses of water, the next week not only did she brought me the proper onions but also planted them in two pots! She is also responsible for keeping the 12 pots of mother-in-law tongues in our bedroom nourished.

She's the epitome of pro-maid. One of her "bosses" (as she refers us whom she works for) in the building was leaving to France for good. Among the many things he gave her was a bag of farina flour. She knew I cook and so she gave it to me. Took me sometime to figure out what to do with them. I got confused by the different definition of farina flour on internet. Is it sooji? Semolina? Type 00 or 0? Anyway among all the Italian words on the package is the picture of pizza and croissant. That must be what it's for?

So that's how I came to use farina flour in this pizza dough recipe. I was going to use Peter Reinhart's Bread Baker's Apprentice but it's too intimidating for a beginner pizza dough maker. Not to mention I am always hesitant when it comes to making dough. Hence I resorted to something much less complicated from the net. I did steal some techniques Mr Reinhart offers in the book such as kneading with hand.


Ingredients:
(makes 4 (8") pizza)
  • 1 teaspoon instant yeast
  • 1 teaspoon honey
  • 1 cup warm water
  • 3 cups farina flour
  • 1 teaspoon sea salt
  • 1 tablespoons extra-virgin olive oil
  1. In a small bowl, dissolve honey in warm water.
  2. In a large bowl combine flour and salt. Add oil, yeast and honey water. Use one hand to mix the dough, and the other to turn the bowl, (turn in both direction) until the dough forms ball shape.
  3. Turn the dough out onto a clean work surface and knead by hand for 2 or 3 minutes longer. The dough should be smooth and firm. Cover the dough with a clean, damp towel and let it rise in a warm spot for about 30 minutes. When ready, the dough will stretch as it is lightly pulled.
  4. Divide the dough into 4 balls. Work each ball by pulling down the sides and tucking under the bottom of the ball. Repeat 4 or 5 times. Then on a smooth, unfloured surface, roll the ball under the palm of your hand until the top of the dough is smooth and firm, about 1 minute. Cover the dough with a damp towel and let rest 15 to 20 minutes.
  5. Wrap the balls in plastic and refrigerate for overnight or up to 2 days.

Maple Pecan and Pear Spelt Scones with Maple Pear Butter

This lady whom I'm doing rehabilitation work with, Shobie, has been putting herself on a diet. She's also religiously following the liver detox menu I gave her - it's no joke walking around carrying 96kg of weight. Being a vegetarian, she's not contented with just vegetables (something to think about). She loves everything starchy and processed especially white rice and mashed potatoes. She claims she can eat just rice and broccoli, whole day.

However she's determined. She got rid of the bag of candies that her nurse carried around with her, and she shunned social events just so she doesn't "have to" eat them (peer pressure, I guess). If you knew her, you'd know how big of a sacrifice that is for her. In order to keep her motivation high, I decided to make a deal with her: she shall eat no sweets and refined carbohydrates unless it's from me; I will bring her one treat every week.

It was very daring of me to do so given what a foodie she is. But she approved of my bagels "I need you to open a bakery", "you should sell your bagels to au bon Pain". That gave me plenty of confidence.


I decided to start with scones - her favorite -. Despite her distaste for whole wheat products, I used spelt flour in this recipe. It's nuttier and sweeter than usual whole wheat flour - an answer to people who want good, tasty whole grain products. Spelt has high water solubility, so the nutrients are easily absorbed by the body. It is also higher in fiber, B Vitamins and proteins than the common varieties of commercial wheat. People who are allergic to wheat may be able to tolerate spelt because its proteins are easier to digest. Nevertheless, it is NOT gluten-free.

It doesn't have an exciting flavor as the Strawberry and Goat Cheese Scones or the Wholewheat Blueberry and Raisin Sour Cream Scones. However, the scones have just the right amount of softness that they feel like "home". I loved watching how the maple pear butter just melt over the warm scones. Not only did Shobie approved, she also raved about them to her sister, San, whom together with her husband, I'm teaching Yoga to. I brought some to San the next day: you can't please one sister and not the other while both of them are your paying clients.

Ingredients:
(makes 16 small scones or 10 large scones)

For the maple pear butter:
  • 1 large ripe sweet pear, peeled, cored and cubed
  • 1/4 Cup butter
  • 1 1/2 Tablespoon pure maple syrup
  1. Simmer pears in a pot of water over medium heat until pears are soft and water evaporated.
  2. Let cool slightly. Stir in butter and maple syrup. Let stand at room temperature to thicken before storing in refrigerator.


For the scones:
  • 3 Cups Organic Spelt flour
  • 1/3 Cup natural cane sugar
  • 2 teaspoons baking powder
  • 1 teaspoon cinnamon
  • 1/2 teaspoon baking soda
  • 1/4 teaspoon salt
  • 3/4 Cup butter, cut
  • 3/4 Cup buttermilk (lemon juice + milk)
  • 1 teaspoon pure vanilla extract
  • 2 medium size sweet pears, peeled and diced
  • 1/2 Cup chopped pecans
  • sugar
  1. preheat oven to 180C.
  2. Combine flour, sugar, baking powder, cinnamon, baking soda and salt in a medium bowl. Cut in butter with a pastry blender until butter is the size of peas. Stir in buttermilk, vanilla extract, pears and pecans. Turn mixture onto a lightly floured board and knead several times until dough is smooth.
  3. Separate dough into 4 portions. Press each portion into a 5" circle and cut into 4 wedges with a sharp knife. Or, roll dough out into a 10" circle and cut into 10 wedges.
  4. Place wedges 1-inch apart on a baking sheet lined with parchment paper. Sprinkle lightly with sugar. Bake for 20 minutes or until golden brown on top.
  5. Serve warm with Maple Pear Butter.

Tuesday, December 1, 2009

Cheesy Enchilada with Homemade Salsa


I read somewhere that sesame oil is great for making salsa. And since salsa is Mexican, I decided then on I'll use pure sesame oil for everything Mexican. By the way it's the same oil that we use as body lotion, as we do with pure coconut oil. By the way, which is more weird: I take the oil from bathroom to use in kitchen, or, I apply the oil in kitchen on my skin.

The idea of making enchilada came when I asked Adrian to name an ingredient for dinner. He said avocado. He was going to make me enchilada for my belated birthday but due to time constraint he changed his mind to something with phyllo dough. Anyway I thought I would fulfill that "good will wishful thinking" of his.

I think Mexicans are easy to make, provided you have all the right ingredients: chillies, cheeses, spices, etc. It's quite a preparation with lots of chopping. But once prepared, it's all about putting them together. Mexicans always come with such colorful and vivid display; a treat to both the palate and sight.


I have had burrito, nacho and taco before but not enchilada. I wasn't sure how much sauce was needed to bake; are the tortillas supposed to be crispy or soft? Soupy or dry? Asking Adrian seemed pointless since he wasn't quite an avid fan of enchilada. Although he did, in an uncertain tone, say they were soft. Of which he later said he prefer them crispy. In the end, they were neither soft nor crispy, with the consistency of a lasagna. Whatever. We both loved it. We were both doing the "Adrian dance" - a spontaneous show of body movement only happens with good food - while savoring the dish.

We had it served with
Guacamole, refried beans and sour cream (1 TB lemon juice + 1 C cream).

Ingredients:
(makes 2 servings)
  • 4 tortilla
  • pure sesame oil
  • 1 glove garlic, minced
  • 1/4 large onion, chopped
  • 1 cup homemade salsa
  • 2 tablespoons tomato paste
  • 1/4 cup water
  • 2 roasted tomatoes, crushed
  • 2 cups grated Monterrey Jack cheese
  • Cilantro leaves to garnish
  1. Preheat oven to 150C. Lightly grease casserole pan with sesame oil.
  2. Heat 3 tablespoons of sesame oil over a frying pan. Add a tortilla to the pan. Cook for 2-3 seconds, lift up the tortilla with a spatula, add another tortilla underneath. Cook for 2-3 seconds, lift again, both tortillas, and add another tortilla underneath. Repeat the process with all the tortillas, adding a little more oil if needed.
  3. Melt tomato paste with 1/4 cup of water. Mix in salsa and crushed tomatoes.
  4. Saute onion and garlic with a pinch of salt. Turn off heat when fragrant. Stir in salsa mixture. Taste and season with sugar if too sour.
  5. Flatten tortilla over the counter. Fill 2/3 of tortilla with cheese. Roll it up and put it, seam side down, in the casserole pan. Repeat with the other tortilla.
  6. Pour salsa sauce over tortilla. Make sure all is covered with sauce. May add more water if it is not. Top with grated cheese. Bake at 150C for 10 - 15 minutes, or until cheese melts.
  7. Garnish with cilantro. Serve with Guacamole, refried beans and sour cream (1 TB lemon juice + 1 C cream).

Guacamole


I like Mexican cuisine for its varied flavors, colorful decoration, and variety of spices and ingredients. The latter makes it a challenge to cooking Mexican here in the South Eastern region of the world: although there are many prepared, canned Mexicans for sales, raw ingredients such as chillies with varying degree of hotness are hard to come by. Clever use of the right chili is an art unto itself, too. I always resort to Foodsubs for advises of substitution.


This recipe, for instant, uses habanero chile, which is one of the most intensely spicy species of chili peppers. I intended to use serrano chilies, a less spicy chili, but they were not available. If you are using serrano chillies, double the amount used. If it's too hot for your liking, temper it with sour cream (lemon juice + cream). A quicker way to guacamole is to mix chopped avocado with 1/4 cup of salsa. Tomatoes are an optional garnish.


Ingredients:
(makes 2 side servings)
  • 1 ripe avocado, peel and chopped
  • 1/4 large red onion, minced
  • 1 habanero chile, stems and seeds removed, minced
  • 1 tablespoons cilantro leaves, chopped
  • 1 tablespoon lemon juice
  • sea salt and ground black pepper to taste
  • 4 vine-ripened cherry tomatoes, seeds and pulp removed, chopped
  1. In a medium bowl, mash avocado. Add onion, habanero chile, cilantro and lemon juice. Stir, taste and season with salt and pepper.
  2. Cover with plastic and store in refrigerator to prevent oxidation. Add chopped tomatoes just before serving.

Refried Bean


I used to wonder why is refried bean called refried bean. I thought they were like refried oil and got disgusted by it. Actually the word "refried" is a misnomer. It comes from refritos which actually means "well-fried". Now doesn't that sound agreeable to the taste buds than "refried"?

Since we don't have a pressure cooker, I used the regular method of cooking the dried pinto beans: boiling water. It took closed to 2 hours to get all 500gram of them soft and done (I freeze whatever amount that I'm not using for future cooking so I don't have to go through the 2 hours boiling time again). If you have a pressure cooker, it cuts down the cooking time a lot.

You can make a whole bunch of them and freeze the extra - It's easy to reheat refried beans: add water and refried beans to pan and fry them over heat.

Ingredients:
(makes 2 servings)
  • 2 cups cooked pinto beans, strained
  • 1/2 medium onion, chopped
  • 2 tablespoons pure sesame oil
  • 1/4 cup water
  • Salt to taste
  • Cheddar cheese, grated
  1. Heat pure sesame oil in a saucepan. Sautee chopped onions with a pinch of sea salt until translucent. Add cooked pinto beans and water. Season with salt. Stir in cheese until melted.

Tomato Salsa

The original recipe uses canned whole fire-roasted tomatoes. I refused to buy anything that I can make at home.


Ingredients:
(makes 2 - 3 cups)
  • 4 medium-sized ripe but still firm tomatoes
  • 1 Jalapeno pepper, chopped
  • 1 clove of garlic, minced
  • 1/3 Cup green onions, chopped
  • 2 tablespoons pure sesame oil
  • 2 teaspoons balsamic vinegar
  • 1/4 teaspoon dried oregano
  • 1/4 Cup cilantro leaves, chopped
  • sea salt and ground black pepper
  1. Put tomatoes under a broiler until the skin is blistered all over, remove from the oven, let cool, remove the skin.
  2. In a large bowl, shred and break up tomatoes with fork and knife. Add jalapeno pepper, garlic, green onions, sesame oil and balsamic vinegar. Stir in oregano and cilantro. Taste and season with salt and pepper.
  3. Keep refrigerated when not using. Can be store for up to 5 days.

Monday, November 30, 2009

Adrian Cooks

This year was the first time in 16 years I celebrated my birthday without any of my 7 childhood friends around. I managed to have a belated celebration with them last year when I visited KL in late November. I thought I would do the same this year but it didn't happen. Although I felt something was missing but I still had a very good time with many firsts:

Oil painting of Totoro from Yim.


Homemade Strawberry Cheesecake from Gate. (Note: the studio maid, Ba Dom, poses at the back)


Todd bought me my first alcohol in 4 years: tequila shot. I got sore all over my neck and shoulder the next day.

There's also a sketch of a Yogini in Tree pose from Peewee, and birthday song sang by my favorite Baritone, Or. Not to forget my Thai good friend, Nook, whom spent the day with me while my husband was busy at work.


Nook taking picture of the foods at The Deck, Arun Residences.


An outrageously expensive Japanese dinner at Tsunami. Although the staffs sang me birthday song and gave us complimentary Japanese melon as birthday treat, still, it's waaaay overpriced.

Months before my birthday I told Adrian I wanted nothing but his cooking. There's a history that leads up to this:

Two years ago when we just met, I told him I wasn't the cooking type. He on the other hand told me he did. I thought what a great deal: my man is handsome, smart AND he cooks! Two years into that conversation I, the one who didn't cook, now have a food blog. Adrian, still handsome and smart, was yet to show the third quality that I so valued. Something was amiss, I thought.

So I got him to promise to cook for my 29th birthday. Despite the fact that he was busy on my birthday, I wasn't the slightest unhappy because of what's to come the following week. He was going to make me breakfast but I wasn't going to let him get away with that - a breakfast and a dinner.

I caught glimpses of him surfing the net for recipes. It made me happy. Finally came the big day. I came home after a morning rehabilitation work with my client to a spread of brunch. On the table was polenta (sun-dried tomatoes, onions, cheddar) served with mushroom and fried egg - an adaptation of my Parmesan Polenta with Chili-Roasted Mushrooms; Pomegranate Salad with Maple-spiced Pecan and Honey-mint Lemon dressing; and the best smoothie he ever made with yogurt, frozen blueberry and dried fig!


I was so happy he did it for me. Imagine how excited I must be for the dinner to come! He was to make it the next evening. In the afternoon he mentioned he would go to work the next afternoon and that he would make me dinner another day. I was very very very disappointed and didn't speak to him for the rest of the afternoon. He noticed my long face and was concerned. I told him how I felt and he said he was going to do it but hadn't had the chance to tell me. That put the smile back on my face. How easily manipulated I am.

He wanted to make enchilada but given the time factor, he decided to go with something easier and less demanding. I'm not sure what it's called. This is what I gathered:
  1. Sauteed together yellow pepper, red pepper and spinach.
  2. Blend firm tofu, cheddar, cream cheese and cream.
  3. Mix them all together.
  4. Layer phyllo dough over a baking dish, fill it with vegetables. Cover with more phyllo dough. Sprinkle with poppy seeds and bake.


It was a bit bland to taste. But we figured there's a lot of room to play with the ingredients. For instance, roast the vegetables; substitute tofu with feta cheese; use a mixture of cheddar and gruyere; etc.

So there's my 29th birthday. Birthdays are always good :)